<--- Return to Projects Page
Build Log: Pi-Star
Introduction
In this article I'll be covering the provisioning and deployment of my DMR hotspot using an MMDVM board and Raspberry Pi 3B+. The process took a whole afternoon so I won't bore you with all the nitty gritty details or in-depth troubleshooting, just the highlights.
Step 1: Flashing the SD Card
This was a large part of the time investment on this endeavor, surpassed only by the process of dialing in the offset. This shouldn't have taken as long as it did as I've don't this before in previous Pi projects. It's simple really, download the OS image, flash it to an SD car, and boot. I did this about three or four times on different computers wit different software before I finally decided try a different SD card and realized I had been using a 2GB card the whole time! this was the source of my troubles as these OS images really like to have 10GB or more. Once I swapped to a correctly sized SD things went as expected
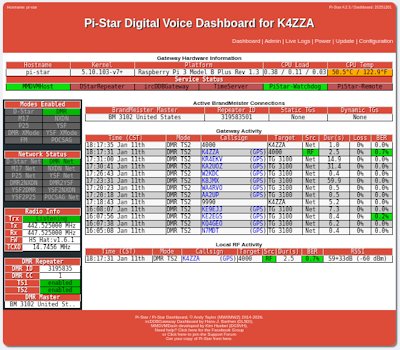
Once I could access the dashboard it was time to enter all the settings. This is where I'm editing out a lot of time on this write-up. It was entirely a matter of following various youtube guides and entering the information required in the configuration page, not very exciting.
Step 2: Troubleshooting
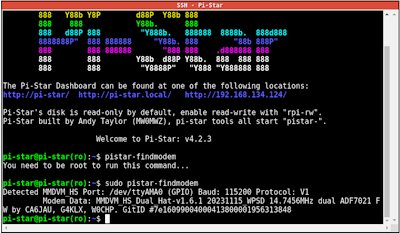
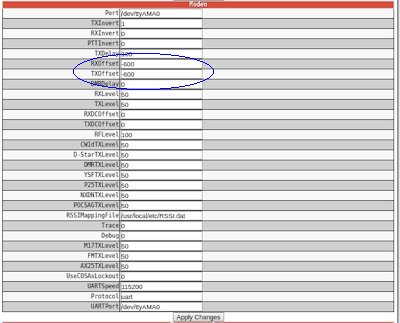
Once all the configuration info was entered I though we'd be off to the races but when is it ever that simple? Every time I tried to connect to the hotspot I'd get a busy signal and show no local traffic on the dashboard. The first thing to do was ensure that the Pi could even see the MMDVM hat. To do this was a simple matter of using SSH within Pi-Star to talk to the Pi and check if it could identify the hat. Once that was established I attempted using different drivers and experimenting with different offset values for TX and RX. Eventually, through trial and error, I found that an offset of -600Mhz allowed the radio and the hat to communicate! Once that was complete I added a few talkgroups to the codeplug (which took a little trial and error itself), programmed the radio and I was off to the races!
Conclusion
This was honestly a bit more frustrating of an experience than I expected but once I was able to key-up into the World Wide talkgroup and hear accents from Indonesia and Australia in shack it was all worth it. Considering the setup and troubleshooting would have been just as necessary with a prebuilt device I'm happy I went this rout and could have the added enjoyment of knowing I put the whole thing together myself.
I'm excited to get more involved with DMR and making contacts. When I limited myself to the Technician license I thought international contacts would be out of reach until I could upgrade to General. Thanks to this little device I'm able to really reach out and talk to HAMs from all over the globe and that's pretty cool.
<--- Return to Projects Page